Last Updated: December 2025
Here's the honest truth: I took some of my best Himalayan shots with a beaten-up smartphone that had a cracked screen protector.
Meanwhile, the guy with the $3,000 Canon setup? His memory card corrupted at 5,200 meters, and he lost everything. I'm not saying expensive gear is bad—far from it. But after leading dozens of treks and watching hundreds of trekkers fumble with their equipment in -20°C weather, I've learned something crucial: the mountains don't care about your camera's megapixel count.
So whether you're bringing your trusty iPhone, a basic point-and-shoot, or your grandpa's old DSLR, this guide will help you capture those jaw-dropping Himalayan moments that'll make your friends back home seriously jealous.
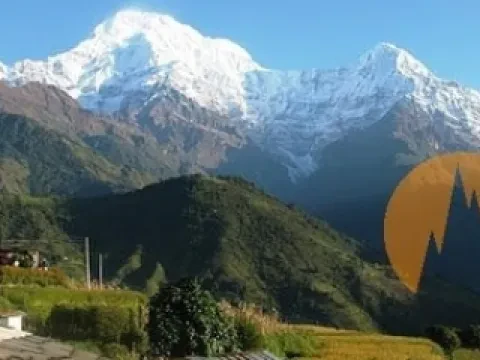
Look, I get it. When you're standing in front of Everest, Annapurna, or Manaslu, you want the BEST photos possible. But here's what most photography guides won't tell you: smartphone cameras have gotten ridiculously good.
Last season, one of our trekkers—Katrina from Melbourne—shot her entire Everest Base Camp journey on an iPhone 13. Her photos ended up in a travel magazine. No joke.
Why smartphones actually rock in the Himalayas:
That said, smartphones have limits. The zoom is pretty terrible, low-light performance isn't great, and battery life at altitude is... well, let's just say bring a power bank. A big one.
Forget the lens envy. Here's what really makes a difference up there:
I cannot stress this enough: your camera is useless with a dead battery. At altitude, batteries drain 2-3x faster than at sea level. I've watched grown men cry at Kala Patthar because they couldn't photograph sunrise over Everest.
What to bring:
Pro tip: Those chemical hand warmers? Tape one to your power bank. Seriously. It'll hold its charge better.
You'll take way more photos than planned. I guarantee it. That mountain looks different every five minutes as the light changes.
The Himalayas will try to destroy your equipment. Rain, snow, dust, falls—I've seen it all.
Budget-friendly protection:
One trekker on my last Annapurna Circuit trip wrapped his phone in a ziplock and rubber bands. Looked ridiculous. Worked perfectly through three days of rain.
A full-size tripod at altitude is a special kind of torture. Your shoulders will hate you by day three.
Better options:
Honestly? Most of your best shots will be handheld anyway. The light changes too fast to mess with tripod setup.
Equipment matters, but understanding light matters WAY more. You could have a $10,000 setup and still take boring photos if you shoot at the wrong time.
At sea level, golden hour is nice. In the Himalayas, it's absolutely magical. The way morning light hits those peaks... I've literally seen trekkers stop mid-step and gasp.
Timing is everything:
Sunrise (5:30-7:00 AM depending on season)
Sunset (4:30-6:00 PM)
Blue hour (30 minutes after sunset)
My routine: I set an alarm for 30 minutes before sunrise, wrap myself in my sleeping bag by the lodge window, and wait. Coffee in one hand, camera in the other. Some of my favorite shots came from being too lazy to go outside—the window frames actually added to the composition.
From about 10 AM to 3 PM, the sun is directly overhead. Everything looks flat and washed out. Shadows are harsh. Skies are pale.
What to do during the dead hours:
But here's the thing—if you reach a viewpoint at noon, still take the damn photo. A "bad light" photo of Everest is better than no photo of Everest.
This is where people separate themselves from the crowd. Everyone photographs the same mountains from the same spots. But not everyone makes them interesting.
Don't just point your camera at a distant mountain. That's what everyone does. Their photos all look the same.
Add depth with:
I remember photographing Ama Dablam from Tengboche. Everyone was zooming in tight on the peak. I stepped back, included the monastery gate in the foreground, and suddenly the photo told a story about place, not just mountain.
Imagine your frame divided into nine equal sections by two horizontal and two vertical lines. Place interesting elements along those lines or at intersections.
In practice:
That said, sometimes centering works beautifully. Especially with reflection shots in alpine lakes. Trust your gut.
Trails, stone walls, rivers, lines of prayer flags—anything that draws the eye toward your subject.
I once photographed the path to Annapurna Base Camp with fresh snow. The footprints created a natural S-curve leading to the peak. That photo got 10x more engagement than my straight-on mountain shots.
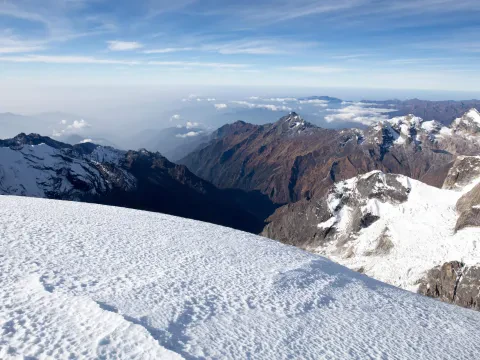
Mountains are BIG. But in photos, they often look... small? Weird, right?
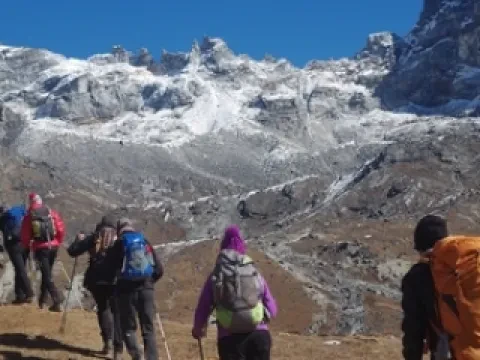
Show scale by including:
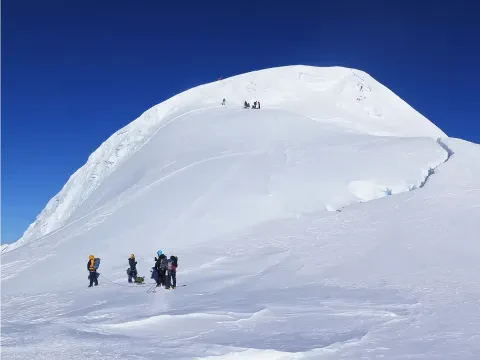
One of my favorite shots: a single trekker crossing a suspension bridge with Everest in the background. The person was maybe 50 pixels tall in the frame. Perfect.
Your phone can do more than you think. You just need to know how to use it.
Phone flashes are terrible. They make everything look flat and weird. Better to embrace low light or use ambient sources.
High Dynamic Range blends multiple exposures to capture both bright skies and darker foregrounds. Essential in the Himalayas where you've got super-bright snow and dark valleys.
Most phones have auto-HDR. Turn it on and leave it on.
Not just for people. Try portrait mode on:
The fake bokeh isn't perfect, but it's better than nothing.
Mountains are wide. Panoramas capture that sweep. But I see people mess this up constantly.
How to actually do it:
Some phones (iPhone Pro models, many Androids) can shoot in RAW format. It's like a digital negative—you can adjust exposure, colors, everything in editing.
File sizes are huge and it requires editing, but if you're serious about your photos, shoot RAW whenever possible.
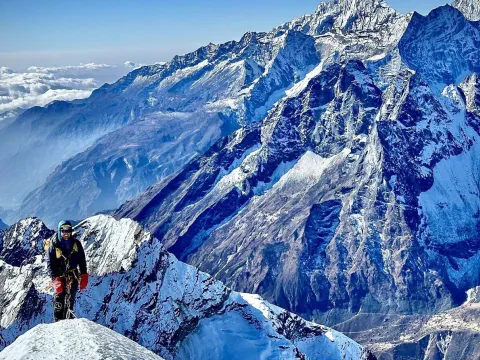
Got a "real" camera? Great. But the altitude, cold, and physical exhaustion will challenge you.
I see trekkers hauling 3-4 lenses and using maybe one. Don't be that person.
What actually gets used:
Pick one, maybe two. I usually trek with just a 24-70mm. If I had to choose ONE lens for the Himalayas, that'd be it.
Auto mode struggles in snow. Your camera sees all that white and underexposes everything, turning bright snow gray.
Quick manual settings for snow:
But honestly? If manual feels overwhelming at altitude (it does for everyone), use aperture priority mode and exposure compensation. No shame.
Never change lenses in dusty or wet conditions. One grain of sand in your sensor equals hundreds of ruined photos.
I learned this the hard way at Thorong La Pass during a dust storm. Ended up with 47 spots on every photo. Had to get my sensor professionally cleaned back in Kathmandu.
The Himalayas throw everything at you: blazing sun, freezing cold, sudden snow, dust storms, and rain. Your gear needs to survive.
Batteries die. Screens freeze. Your fingers go numb. It's brutal.
What works:
At Everest Base Camp last year, it was -22°C at sunrise. I could take maybe 4-5 photos before my fingers stopped working. Then back inside the jacket to warm up. Repeat. Tedious but necessary.
Electronics and water don't mix. Obviously. But you'll still want photos in the rain—those dramatic clouds and misty mountains are too good to miss.
Budget waterproofing:
Don't put wet equipment away. If your camera gets soaked, dry it as much as possible and leave it out overnight with batteries removed.
Lower altitude trails, especially pre-monsoon, can be incredibly dusty. And the wind? Sometimes you can barely stand, let alone hold a camera steady.
Survival tactics:
That last one is important. I've seen people miss incredible experiences because they were too busy fiddling with camera settings.
This section is important. I've seen too many trekkers act like tourists at a zoo, pointing cameras at locals without permission.
Just because someone is in traditional dress or doing something photogenic doesn't mean they're okay being photographed.
How I ask (no Nepali language skills required):
Most people in trekking areas are used to cameras and will say yes. But some won't, and that's their right.
Many monasteries prohibit photography inside. Respect this. Always.
General rules:
I once saw a trekker argue with a monk who asked her to stop photographing during a ceremony. Don't be that person. The photo isn't worth disrespecting someone's sacred space.
If locals let you photograph them, write down their email or WhatsApp and actually send the photos. Most have smartphones now, and they appreciate seeing themselves through your lens.
Children are photogenic. Everyone wants that shot of a smiling local kid. But:
The best kid photos happen when you're just hanging around, not actively hunting for shots.
Taking the photo is only half the battle. Editing elevates decent shots to "how did you DO that?" level.
My go-to apps:
Snapseed (Free, iOS/Android)
Lightroom Mobile (Free version is plenty)
VSCO (Free with in-app purchases)
Less is more. If someone looks at your photo and thinks "wow, heavily edited," you've gone too far.
This is purely my preference, but it works:
Copy these settings and paste to similar photos for consistency. Your Instagram grid will look cohesive.
Sometimes the camera captures exactly what you saw. Don't feel obligated to edit every photo just because you can.
That perfect sunrise? The light was already ideal. Minimal adjustments needed.
Losing your trek photos would be heartbreaking. I've seen it happen, and it's not pretty.
In practice during a trek:
WiFi in the Himalayas ranges from "surprisingly decent" to "is this even connected?" Uploading full-resolution photos can take hours.
Strategy:
Google Photos has worked best for me. Amazon Photos if you have Prime. Dropbox if you're already using it.
Let me share the embarrassing stuff so you don't have to learn the hard way.
Story time: On my first trek to Annapurna Base Camp, I had accidentally set my camera to JPEG Basic quality instead of RAW. Didn't realize until I was back home. Those photos were... fine. But they could've been so much better.
Fix: Check your settings every morning. Camera quality, phone storage space, battery levels.
"Chimping" is photographer slang for immediately checking every photo you take. I used to do this constantly. Know what happened? I missed shots because I was staring at my screen instead of watching the scene unfold.
Fix: Take a few shots, glance quickly to confirm exposure, then put the camera down and actually watch the sunrise/sunset/moment.
Mountains are stunning. But looking back at my early treks, all my photos look the same: peak, sky, done.
Fix: Photograph everything. The food, your gear, your muddy boots, the teahouse cat, your trekking group, the porter's smile, frost patterns on the tent, yak poop (okay, maybe not that).
Those "boring" detail shots often end up being favorites because they remind you of the whole experience, not just the destination.
Finding the balance is tricky. Early on, I was too conservative with photos. "I'll wait for the perfect moment." Guess what? I missed moments because I was waiting for perfection.
Now I shoot more freely, knowing I'll delete 80% later. But I've stopped the opposite problem too: taking 47 photos of the exact same thing because I'm not sure which one is best.
Fix: Take a few variations, then move on. You can decide later which is best.
Most cameras have a back button focus option. Separates focusing from the shutter button. Complete game-changer for tricky situations.
I avoided learning this for years because it seemed complicated. Once I tried it? Never went back.
Fix: YouTube "back button focus tutorial" for your specific camera. Give it two treks to become natural. You'll thank me.
You don't need to spend a fortune. Here's what actually helps:
Total: Around $200 for the full setup. That's less than one high-end lens.
Going on a trek? Here's your checklist. Try to capture all of these:
Landscape shots:
Detail shots:
People and culture:
Action shots:
Atmosphere shots:
I started this post talking about my cracked-screen phone photos. Let me end with this: None of my favorite trek photos came from expensive equipment. They came from being present, patient, and willing to get up at 5 AM in the freezing cold.
Last year at Gokyo Lakes, I watched a guy with a $5,000 Sony setup pack up early because he was cold. Meanwhile, a teenager with a basic point-and-shoot stayed and captured that incredible moment when a cloud parted and revealed Everest bathed in pink alpenglow.
Guess which photos went viral online?
The Himalayas are forgiving subjects. They're so magnificent that even mediocre technique yields decent results. But if you combine that natural beauty with the techniques in this guide—good light, thoughtful composition, patience—you'll create images that don't just show mountains, but tell stories.
Stories of struggle and triumph. Of friendship and solitude. Of human determination against nature's grandeur. Those are the photos people remember.
So whether you're bringing the latest iPhone, a trusty DSLR, or something in between, you're ready. The mountains are waiting, and your camera—whatever it is—is good enough.
Now stop reading and go take some photos.
Bright sunny day:
Sunrise/Sunset:
Cloudy/overcast:
Inside teahouse/lodge:
Stars/night sky:
Have questions about trekking photography or planning your Himalayan adventure? Drop a comment below or reach out to our team at Higher Path Treks. We've helped hundreds of trekkers capture their once-in-a-lifetime journey, and we'd love to help you too.
Ready to book your trek? Check out our Everest Base Camp Trek, Annapurna Circuit Trek, or Langtang Valley Trek options.
<p><br></p>
Planning the Everest Base Camp Trek? Discover the essential packing list, permits, fitness tips, altitude sickness advice and practical preparation tips to help you enjoy a safe and unforgettable trekking adventure in Himalayas Nepal.
<p>Popular for the Himalayas, Nepal is also a trekker’s paradise as there are plenty of destinations with spectacular views and heartwarming culture in this small yet spectacular country. While trekking in Nepal may take many days, there are also shorter treks in the country which are equally rewarding regardless of the number of days spent on foot. One such short yet fulfilling trek in Nepal is the Poon Hill Trek.<br></p>
<p>A recent addition, the much-talked-about trek in Nepal in recent times is the Gokyo Valley Trek. This trek promises to provide the most jaw-dropping views of the Himalayas towering over 8000 meters such as Mt. Everest (8848m), Cho Oyu (8188m), Lhotse (8414m) and Makalu (8463m) along with the largest glacier of Nepal, Ngozumpa. Declared as a Ramsar Site in 2007, Gokyo houses the highest freshwater lake system of the world, consisting of six main lakes. <br></p>
<p>Mera peak is great panorama outstanding view point of 6470m peak in Everest region. Marvelous view of mountains such as: Kyashar- 6770m,Cho Oyu- 8153m,Khangtega- 6685m,Ama Dablam- 6856m,Nuptse- 7861m,Lhotse- 8501m,Baruntse- 7168m,Everest- 8848m,Makalu- 8475m,Kanchaenjunga- 8586m.</p>
<p>Nepal is renowned for its towering mountains and offers some of the best peak climbing opportunities in the world. The country is home to numerous trekking peaks, ranging from moderate climbs for beginners to more challenging ascents for experienced mountaineers. Some of the best peak climbing options in Nepal include popular peaks like Island Peak, Mera Peak, Yala Peak, and Lobuche East, which are famous for their accessibility, stunning panoramic views, and relatively straightforward climbing routes. </p>
<p>When it comes to trekking peaks in Nepal, Mera Peak (6,476m) and Island Peak (6,189m) are two of the most popular choices for climbers seeking high-altitude adventures. Both peaks offer thrilling challenges, breathtaking scenery</p>
<p>Langtang Yala Peak is a stunning mountain in the Langtang Region of Nepal, renowned for its striking beauty and challenging terrain. The peak stands at an elevation of 5,520 meters (18,110 feet) above sea level, offering an accessible yet rewarding experience</p>
<p>Trekking to Everest Base Camp (EBC) is a dream for adventurers worldwide, and many wonder if it’s possible to do it solo. Solo trekking to EBC is indeed possible, though it comes with unique challenges and responsibilities. Unlike guided treks, solo trekking requires self-reliance, careful planning, and a deep understanding of the route, weather, and altitude conditions.</p>
Langtang Valley, often called “the Valley of Glaciers,” is one of Nepal’s most scenic trekking destinations—perfect for both beginners and seasoned hikers. Nestled north of Kathmandu and bordering Tibet, this valley combines breathtaking alpine scenery, warm Tamang hospitality, and cultural richness in a relatively short trek